Discover a professional 3D printing powder supplier
Title: Printing Metal Magic: Your MakerBot M2’s Secret Superpower .

(how to 3d print metal on makerbot m2)
Assume your MakerBot M2 is just for plastic ornaments? Reconsider. Deep inside that acquainted blue box exists a covert skill, a way to conjure actual steel parts. This isn’t science fiction. This comes metal 3D printing, turning your desktop computer device into a miniature factory. Forget needing a million-dollar industrial gear. We’re chatting genuine steel things, solid and useful, born right on your MakerBot M2. Ready to open this alchemy? Allow’s dive into the surprisingly possible globe of printing metal on your reliable M2.
1. What is Steel Printing on the MakerBot M2? .
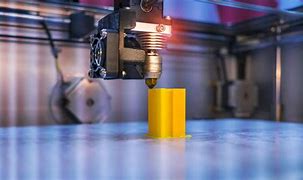
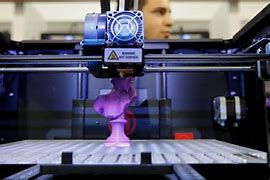
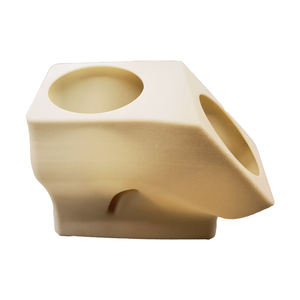
Steel printing on a MakerBot M2 doesn’t imply melting solid metal cord like expensive industrial equipments. That procedure needs lasers and extreme heat far past the M2’s capabilities. Rather, we make use of smart materials called Steel Filament Composites. Photo this: tiny bits of genuine steel– stainless-steel, bronze, copper, also titanium– put on hold inside a special plastic binder. This blend gets shaped by your M2’s extruder much like normal PLA or ABS filament. The magic takes place later on. After printing, a regulated procedure removes the plastic binder. Then, intense warm fuses the metal fragments with each other. The result? A strong metal component. It’s a two-step dance: print the form first, after that transform that “green” component right into pure metal with sintering. The MakerBot M2 takes care of the first, essential action wonderfully, putting down the precise metal-filled kind.
2. Why Try Metal Printing on Your MakerBot M2? .
Why trouble? Due to the fact that it brings actual metal parts available. Industrial steel 3D printers cost a fortune, usually numerous hundreds of bucks. The MakerBot M2 is a fraction of that cost. Using metal composite filaments allows you experiment, model, and produce practical metal elements without that massive investment. Need a custom brace? An one-of-a-kind equipment? A heat-resistant component? Publishing it yourself is suddenly feasible. It offers extraordinary layout liberty. Produce facility inner networks, organic shapes, or lightweight structures difficult with standard machining. Testing designs becomes faster and more affordable. You can iterate quickly using your M2 prior to committing to expensive typical production. It equalizes metal. Enthusiasts, little workshops, instructors, and innovators get to steel component creation. Unlocking this on your existing M2 feels like finding a superpower you never understood you had.
3. Just How to Publish Steel on Your MakerBot M2 (Step-by-Step) .
Publishing the steel composite “green” component knows territory for your MakerBot M2, but needs cautious arrangement. Initially, obtain the ideal filament. BASF Ultrafuse 316L or 17-4PH are top choices for stainless steel outcomes. Filament Technologies also provides great alternatives. Storage is vital. Keep this filament sealed with desiccant; moisture damages it. Next off, prepare your printer. A hardened steel nozzle is important. Standard brass nozzles break fast from the rough metal fragments. Set up one rated for abrasive filaments. Degree your bed diligently. Attachment is crucial. Utilize a tidy, warmed build plate (around 60-80 ° C). Consider a thin layer of specialized adhesive like Magigoo or an adhesive stick for added hold. Print slow-moving. Establish your rate around 20-40 mm/s. Reduced rates guarantee much better layer bonding and decrease nozzle wear. Keep retraction very little. Make use of the producer’s recommended temperature level setups specifically, usually around 210-240 ° C relying on the filament. Print with 100% infill for solid metal parts. Ultimately, handle the printed “eco-friendly” component delicately. It’s breakable before sintering. Package it firmly for the next step.
4. Applications: What Can You Make with M2 Steel Prints? .
The possibilities are broad once you understand the sintering procedure. Useful prototypes lead the pack. Test devices, fit checks, and ergonomics making use of real metal parts that behave like the final product. Personalized tooling is one more winner. Develop jigs, fixtures, or specialized wrenches tailored to your exact needs. Tiny set production becomes viable. Make limited runs of special steel components like custom-made brackets, enclosures, or imaginative pieces. Repairing older machinery is easier. Duplicate a broken equipment or bracket that’s no longer available. The jewelry and art scene enjoys this. Style intricate necklaces, rings, or sculptures impossible to cast typically, after that have them sintered right into solid steel. Hobbyists build stronger components for RC cars, drones, or designs. Engineers examination warmth sinks or liquid circulation parts. The toughness and metal residential or commercial properties open doors plastic just can’t.
5. MakerBot M2 Steel Printing FAQs .
Q: Is the final component really strong steel? A: Yes. After sintering, the plastic binder is completely gone. What stays is a dense, strong metal part, normally over 96% pure steel. It has the properties of the metal utilized (like 316L stainless-steel).
Q: Can I sinter components in the house? A: Normally not securely or effectively. Sintering calls for specific, very high temperatures (usually over 1300 ° C/2370 ° F) in a controlled environment heater. Specialized debinding steps are typically required first. A lot of customers send components to a specialist sintering solution.
Q: How strong are these steel parts? A: Toughness is great, approaching cast metal residential properties, yet typically less than forged or machined parts from solid billet. Think similar to financial investment casting. They are totally practical for several applications.
Q: How much does sintering price? A: Expense differs by provider and component size/volume. Anticipate 10s to hundreds of dollars per set, usually based upon the quantity of components sintered together. It’s still far less expensive than commercial metal printing.
Q: What steels can I print? A: Usual options include 316L Stainless Steel, 17-4PH Stainless-steel, Bronze, Copper, and Titanium. Each needs its particular filament and sintering profile. Accessibility relies on filament producers.
Q: Does the MakerBot M2 need significant modifications? A: Not significant. The important upgrade is a set steel nozzle to take care of the unpleasant filament. Every little thing else makes use of the printer’s standard capacities. Proper settings and careful printing are essential.
(how to 3d print metal on makerbot m2)
Q: Can I print anything? Are there size limits? A: Dimension is restricted by your MakerBot M2’s construct volume (approx 200x200x150 mm). Keep in mind, components shrink considerably throughout sintering (usually 15-20%). Style with this contraction in mind. Really thin wall surfaces or fine information could not endure sintering well.