Discover a professional 3D printing powder supplier
How to Embed Metal right into 3D Prints: Your Practical Guide .
(how to embed metal into 3d print)
Envision creating a plastic item that has genuine metal inside it. That is what embedding steel into 3D printing suggests. Think about it like cooking a cake. You pour the batter (thawed plastic filament) into the mold (the 3D printer develop plate). Before it establishes, you decrease in some chocolate chips (metal pieces). The cake solidifies with the chips caught within. That is the basic idea. We are placing metal components straight right into our 3D printed plastic objects as they are being made. It combines the layout flexibility of plastic printing with the strength or unique attributes of steel.
What is Metal Embedding in 3D Printing? .
Metal embedding is precisely what it seems like. We put strong steel pieces into a 3D printed plastic part while the printer is working. The printer constructs the plastic form layer by layer. At particular points in the printing procedure, we stop briefly the device. We thoroughly include a steel part onto the partially printed plastic layer. The printer after that returns to. It transfers a lot more plastic over and around the steel piece. This locks the metal firmly inside the completed component. It is not about publishing with metal filament. That is various. Embedding uses real, solid steel inserts like nuts, bolts, pins, or personalized shapes. They end up being an irreversible component of the plastic structure. The result is a crossbreed object. It has the complex forms feasible with plastic printing plus the valuable residential or commercial properties of metal where needed.
Why Bother Embedding Steel? .
Plastic 3D printing is impressive for producing complex forms cheaply. Occasionally plastic alone is inadequate. Including metal straight right into the print solves particular issues. It makes parts more powerful in key locations. Think about a plastic bracket holding something heavy. Installing a metal pole or plate right where the anxiety is highest possible makes it much harder. It reduces overall weight. Making a whole component from steel can be hefty and costly. Using plastic for most of the framework and embedding little steel pieces only where necessary conserves weight and price. It includes special features. Required a component to perform power? Installed metal cords or get in touches with. Want something magnetic? Embed a tiny steel item. Required exact strings? Installed a metal nut instead of trying to print weak plastic threads. It allows for post-assembly. Embed threaded inserts or installing factors. This allows you quickly screw various other components onto your print later. It is more reliable than gluing metal on after printing. The metal is secured area by the surrounding plastic.
Just how Do You Really Embed Metal? .
Getting metal into your print requires planning and the ideal method. Here are the major methods:.
1. Pause-and-Place Method: This is the most usual DIY way. You design your 3D version generally. You determine exactly where you desire the metal item. In your slicing software application (like Cura or PrusaSlicer), you add a special command. This tells the printer to stop at a specific layer height. You send this modified documents to your printer. The printer starts building the plastic component. It gets to the assigned layer and stops. You swiftly place your steel insert onto the fresh plastic. Ensure it sits level and safe. You push a switch. The printer continues, covering the steel with more plastic layers. It traps the insert inside. This functions great for nuts, bolts, washers, and pins.
2. Metal-Filled Filaments: These are unique plastic filaments mixed with tiny metal bits. Filaments like copper-filled PLA or iron-filled PLA exist. You print with them like routine plastic. The completed print feels and look somewhat metallic. You can also sand and brighten it to reveal more steel. It is not really installing solid steel. It gives a metal-like appearance and some added weight. The strength gain is usually minor contrasted to solid steel inserts.
3. Conductive Pastes/Paints: This technique is for adding electric courses. You print your plastic part with channels or grooves developed right into it. After printing, you load these grooves with a special conductive paste or paint. These have metal bits like silver or copper. The paste hardens. It creates steel traces embedded within the plastic structure. This serves for making easy circuits, antennas, or sensing units inside prints.
Applications: Where Metal Embedding Beams .
This technique is useful in many areas:.
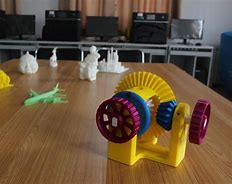
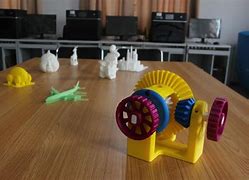
Prototyping & Practical Versions: Designers utilize it to produce functioning models. Installed metal shafts in gears. Add steel calls for switches. Consist of threaded inserts for setting up. This makes prototypes a lot better to the end product.
Custom-made Equipment & Jigs: Workshops profit substantially. Develop personalized clamps with embedded steel reinforcing plates. Make assembly jigs with precise metal situating pins. Construct specialized devices that incorporate plastic handles with metal working ends.
Robotics & Electronic devices: Robotics projects use it thoroughly. Installed metal bearings in plastic electric motor installs. Include metal mounting points for sensors and actuators. Embed conductive courses for circuitry inside robot arm or legs. This keeps things neat and durable.
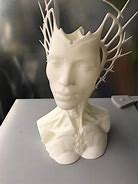
Art, Jewelry & Style: Musicians produce one-of-a-kind items. Installed tiny ornamental metal shapes within clear resin prints for shimmering results. Fashion jewelry manufacturers embed metal findings or clasps straight right into printed styles. Designers add metal weights for much better feeling or equilibrium.
Aerospace & Automotive (Hobbyist/Small Scale): Also popular fields, embedding aids. Reinforce important plastic components in model planes or drones with embedded steel poles. Add steel heat-set inserts near engine installs in RC cars for durability. Produce personalized brackets with ingrained threaded bosses.
Frequently asked questions: Your Steel Embedding Questions Responded To .
Does this service any 3D printer? Mainly yes. The pause-and-place approach deals with nearly all FDM printers. You simply require cutting software application that supports including time out commands. Metal-filled filaments need a printer that can deal with unpleasant products. A solidified steel nozzle is necessary to stop wear. Conductive pastes simply require a constant hand for application.
Is it costly? Not necessarily. The metal parts themselves are normally small and cheap. Requirement nuts, screws, and pins expense extremely little. Specialized inserts may cost more. The plastic filament price is the same as a routine print. The largest expense is your time establishing it up. Metal-filled filament prices more than basic PLA however is still cost effective.
Exactly how strong is the bond? It depends. For the pause-and-place technique, the bond relies upon the plastic clutching the metal. Great surface area contact is vital. Knurled or threaded inserts grasp far better than smooth pins. Metal-filled filament bonds well layer-to-layer. Its strength is a lot more concerning the plastic matrix than real metal bonding. Conductive paste bonds mechanically to the plastic groove.
What metals can I install? Virtually any type of solid metal piece works if it fits. Typical selections are steel, brass, copper, and light weight aluminum. Stay clear of steels that melt at printing temperatures. Plastic prints around 200-250 ° C. So steels like solder or low-melting alloys may flaw. Avoid responsive steels unless coated. Make certain the metal is clean for better attachment. Oily or oily steel will not grip well.
(how to embed metal into 3d print)
Any type of pointers for success? Layout issues. Leave enough area around the metal insert for plastic to flow. Make pockets somewhat bigger than the insert. Add small holes in the plastic below for better hold. Utilize a brim or boating for security. Pause at the ideal height. The layer ought to be just high sufficient to seat the insert safely. Tidy the insert. Usage isopropyl alcohol. Place it quickly and squarely after stopping. Safeguard it if required. A bit of glue can hold it up until printing resumes.